🔍 Contents
- Requirements
- Viewing list entries and opening details
- Adding new list entries
- Editing list entries
- Editing multiple entries at once
- Filtering, sorting, and saving views
- Completing and deleting entries
- Tips & Best Practices
- FAQ
✅ Requirements
- 🔐 Permissions: As a team member, you automatically have read and write rights in the team boards of your team.
ℹ️ Note: You work with existing lists. Creating and configuring lists is reserved for System Administrators – see 📐 Creating and managing list templates.
📖 Viewing list entries and opening details
- Open the desired list in the team board.
- Click on an entry to open the detail view with all fields.
📸 Screenshot: Detail view of a list entry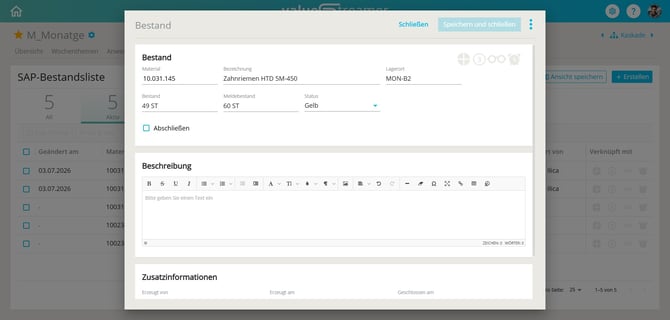
ℹ️ Note: In the detail view, alongside the column values, you also see the description field as well as linked deviations or measures, if available.
➕ Adding new list entries
- Click the "+" icon at the top right.
- Fill in the fields according to the columns defined by the administrator.
- Mandatory fields are indicated by red field labels.
- Depending on the template, different field types are available (e.g. free text, dropdown, date, checkbox, priority, responsible person).
- Optional: Use the description field for detailed free-text content – including formatting, images, and tables.
- Save the entry.
📸 Screenshot: New entry with mandatory fields marked in red 
ℹ️ Note: Which fields and field types are available is defined by the list template.
⚠️ Caution: Images and tables in the description field are not included in the CSV/Excel export. For details: 📤 Who can export lists?
✏️ Editing list entries
- Open the list and select the entry you want to edit.
- Make your changes.
- Save the entry.
🔀 Editing multiple entries at once
With the List Editor 2.0, you can select multiple entries at once and process them in a single step.
- Activate the checkboxes of the desired entries – or select all via the header checkbox.
- Using the action bar that appears, you can edit the selection collectively or archive them as done via "Complete".
✨ Tip: Ideal for post-meeting follow-up – complete several finished items in a single step.
👉 Details: 📋 Closing list entries
🔎 Filtering, sorting, and saving views
Sorting, filters, and column display can be adjusted directly in the list view and saved permanently as a view.
👉 Details: 📋 Filtering and Sorting in Lists
✅ Completing and deleting entries
- Complete: Finished entries are archived as "done" – individually or via multi-select.
- Delete: Deletion is possible provided you have write rights in the team board.
👉 Details on completing: 📋 Closing list entries
✨ Tips & Best Practices
- ✅ Ensure data quality: Make sure entries are complete and correct.
- ✅ Use consistent terminology: This makes searching and filtering easier.
- ✅ Use the description field deliberately: For context that goes beyond the plain column values.
- ✅ Maintain lists regularly: Complete finished entries to keep the view clear.
❓ FAQ
How do I recognize whether a field is mandatory? → Mandatory fields are indicated by a red label. Without filling them in, the entry cannot be saved.
Can I edit multiple entries at once? → Yes. Using the checkboxes in the list view (List Editor 2.0), you can select multiple entries and edit or complete them collectively.
Can I delete existing entries? → Yes, provided you have write rights in the team board.
Are images from the description field exported? → No. Images and tables within the description field are not included in the export.
What is the difference between tenant-specific lists and core lists? → Tenant-specific lists are created and designed individually by the System Administrator. → Core lists (e.g. Feedback, Go & See, ReKo Attendance, Top Topics, Weekly Topics) are predefined by the system and cannot be modified.