🔍 Content
-
Create a new KPI template
-
Configure KPI
-
Delete a KPI template
-
Tips & Best Practices
-
FAQ
✅ Create a new KPI template
Open the gear icon
Click the gear icon at the top right.
📸 Screenshot: Navigation bar with gear icon
Navigate to KPI Templates
From the left menu: Templates → KPIs
📸 Screenshot: Selecting "KPIs" in the left navigation
Create new template
Click the “+” icon
📸 Screenshot: "+ New KPI Template" button
🚧 Configure KPI
Step 1: Define title & category
-
Select an existing category (e.g., Quality, Deviations)
-
Enter the title in multiple languages

-
Categories can be modified or extended

Step 2: Enter basic data
-
Define unit (e.g., %, pieces, minutes)
-
Choose data type (integer or decimal)
-
Set collection interval (Day / Week / Month)
-
Set default data point (Current or Last value)
Explanation:
-
Current value = today / current week / current month
-
Last value = yesterday / previous week / previous month
-
📸 Screenshot: Form for unit and interval
➕ Add new unit
If the desired unit is not in the dropdown, you can add it directly:
-
Enter the name of the new unit
-
Click the suggested option “Add [unit]” in the dropdown
-
In the dialog "Add new unit", enter the name in German, English, and Vietnamese and a short code (max. 5 characters)
-
Save with "Create"
📸 Screenshot: Add new unit from dropdown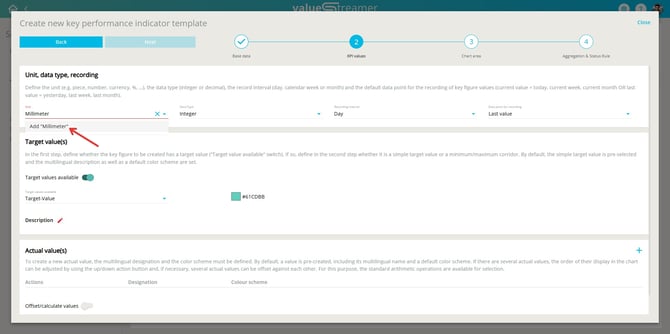
📸 Screenshot: Dialog "Add new unit" with language fields and abbreviation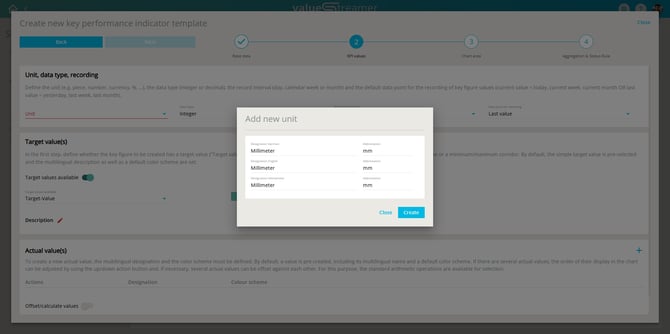
ℹ️ Note: New units can be edited or deleted later – except standard units like "Time".
⚠️ Warning: The standard unit "Time" has limitations:
-
Only usable when exactly one actual value is defined
-
Aggregation not allowed
-
Y-axis is automatically scaled in hh:mm format
-
The unit "Time" cannot be edited or deleted
✨ Tip: Use custom units for specific use cases like energy consumption (kWh), machine runtime (min), or cycle time (seconds) – this increases KPI clarity.
Step 3: Configure target value(s)
-
Enable "Target values available"
-
Set a simple target or min/max corridor
-
Define color coding for target values

Step 4: Define actual values
-
Define at least one actual value (e.g., defective parts)
-
Optionally: Calculate derived values (e.g., scrap rate via division)
-
Select calculation method (addition, division, multiplication)

Step 5: Set chart type & display
-
Select chart types (line, bar, etc.) for actual/target/result
-
Configure display intervals (e.g., last 7 or 30 days)


Step 6: Aggregation & status rule
-
Enable aggregation (average, sum)
-
Define status rule (e.g., "Red if ACTUAL > TARGET")
-
Optional: "Red if any child = Red" to reflect child team or sub-KPI issues

🗑️ Delete KPI template
-
Select the KPI template (checkbox)

-
Click Delete

-
Read the confirmation text and confirm deletion

ℹ️ Notes:
-
Only system administrators can create, edit, or delete KPI templates
-
CORE KPIs cannot be edited
-
Deleted templates cannot be restored
-
Linked content such as feedback, measures, or Go & Sees will be removed upon deletion
✨ Tips & Best Practices
-
Keep titles clear and concise (“Scrap Rate” instead of “Share of defective parts”)
-
Add translations at creation time
-
Use consistent color schemes across teams
-
Match display intervals and chart type to your data
-
Check if teams are still linked before deleting
❓ FAQ
Can I restore a deleted template?
→ No, restoration is not possible.
Who can delete KPI templates?
→ Only system administrators.
What happens to linked content?
→ It will be deleted (Top Topics, Go&See, feedback, deviations, and measures) – except archived content.
Can I edit an existing KPI?
→ Yes, but only partially (e.g., colors, display options, status rules).