Setup VS Excel Importer
To run the Excel Importer, the following components are required:
- an Azure tenant
- a certificate + fingerprint
- an Azure AD Admin App
- an Azure AD application for the Excel Importer
- one or more SharePoint site IDs from which Excel files can be imported
Optional: Creating a certificate
If no certificate exists yet, a self-signed certificate can be created by following these instructions
If a certificate in .CER, .PEM, .CRT format is not yet available, a self-signed SSL certificate (.PEM) can be generated using OpenSSL
- open the OpenSSL command line in Windows
- navigate with cd path/to/folder to the directory where the certificate should be saved
- create a certificate with the following command
This generates a certificate (public key) and a key (private key), which are necessary in another step later in the process.
Optional: Creating an Admin App
If an AdminApp for assigning SharePoint permissions does not yet exist in the Azure tenant, the following steps are required
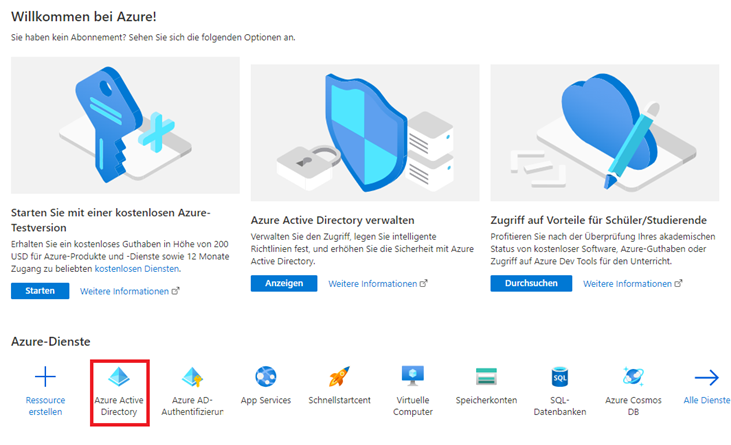
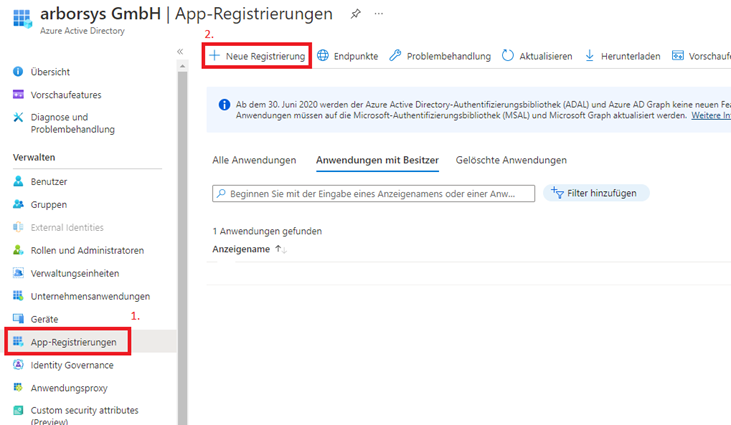
- log in to the Azure Portal
- via
Azure Active Directory > App-Registration > Add new registration
create a new app registration
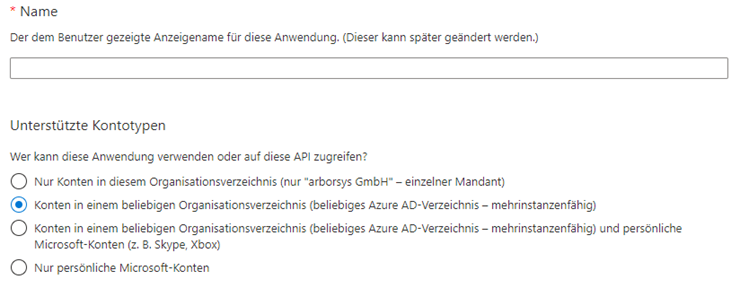
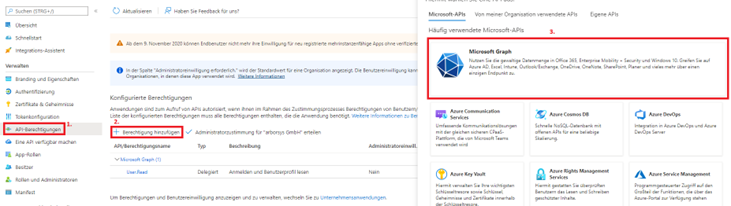
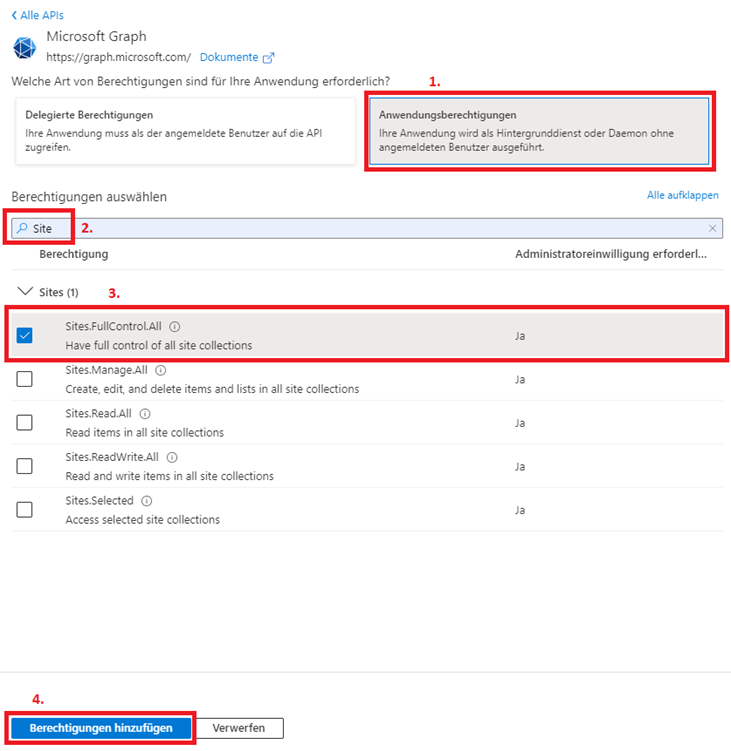
- Under
API Permission -> Add Permission -> Microsoft Graph -> Application Permissions ->
Under Sites Sites.FullControl.All select and add
This will give the AdminApp the correct permissions to give the Excel Importer application access to the SharePoint sites from which the Excel files can be imported later.

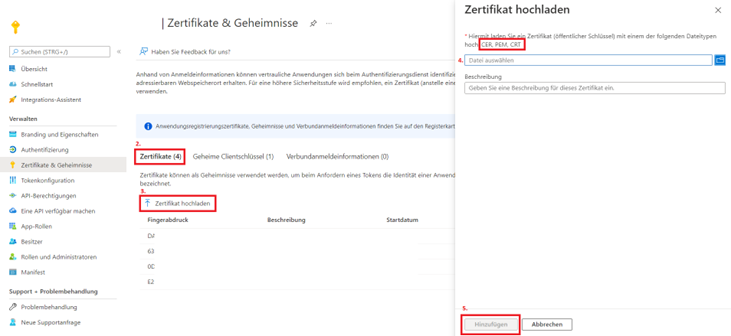
- In order to be able to assign permissions for access to SharePoint later on, a Client ID and a Client Secret must be generated for the app. These can be generated in the
Certificates & Secrets section.
Client ID and Client Secret are only required to grant access to the SharePoint sites and should not be shared.
Process for provisioning and renewing the client certificate
The client certificate for authentication on the Sharepoint server has a specific validity or expiration date. It is the customer's responsibility to provide the ValuesStreamer support team with a new certificate including the fingerprint in time, i.e. at least four weeks before the current certificate expires.
This certificate can only be updated by the ValueStreamer Support. If the certificate expires before a new certificate has been made available, no communication with the Sharepoint Server and therefore no import of the key figures via the Excel Importer is possible!
1. Creating the “Excel Importer” Application
- log on to the Azure Portal
- Create a new app registry via Azure Active Directory > App Registries > Add New Registry. 3.
- In the newly created app registry, upload the certificate (already existing or generated in the previous step) under Certificates & Secrets > Upload Certificate.
After the certificate has been uploaded, save the certificate fingerprint for later.
2. Getting the SharePoint Site ID
2.1 Creating the SharePoint Site (optional, if not available)
In case there is no SharePoint site available from which the Excel files are to be imported, then it can be created by following the steps below: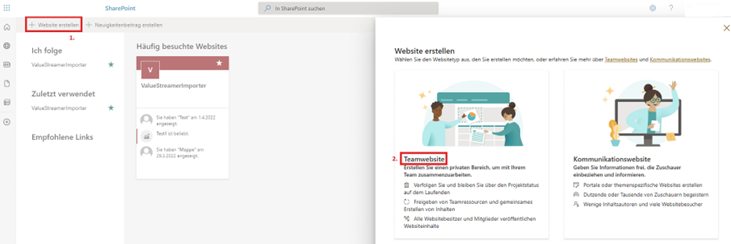
- call up the company's own SharePoint site
https://Domainname.sharepoint.com/_layouts/15/sharepoint.aspx)
- click on "Create website" and select "Team website"
- give the site a name and click on "Finish"
2.2 Getting a SharePoint Site ID
To access the data later, the SiteID of the page is required, which is visible in the following URL:
https://Domainname.sharepoint.com/sites/Seitenname/_api/site/id
In the displayed XML output you can find the UUID of the SharePoint site.![]()
The SharePoint Site ID is needed in the next step for assigning permissions and configuring imports.
3. Assign permissions to access the SharePoint site
To give the app access rights to the SharePoint site you have to execute the following HTTP requests with the help of the AdminApp via a tool like e.g. Postman If there is no Admin App yet, see Optional:-Erstellen-einer-Admin-App
1. Creating an Access Token
POST https://login.microsoftonline.com/{tenantID}/oauth2/v2.0/tokenHeader:
Content-Type: application/x-www-form-urlencodedBody (x-www-form-urlencoded):
client_id: {Client ID der Admin App}grant_type: client_credentialsscope: https://graph.microsoft.com/.defaultclient_secret: {Client Secret der Admin App}In the response there is an access_token, which is needed in the next step.
2. Granting access to SharePoint Site
For every SharePoint site that the Excel Importer App should have access to, the following request must be executed once with the appropriate site Id:
POST https://graph.microsoft.com/v1.0/sites/{siteID}/permissionsAuthorization:
access_token from the previous request as the bearer token.
Header:
Content-Type: application/json
Body:
{ "roles": ["read","write"], "grantedToIdentities": [{ "application": { "id": "{ClientID der Excel Importer App}", "displayName": "{Name der Excel Importer App}" } }]}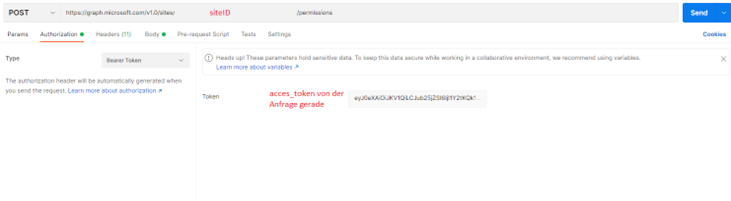

Now the "Excel Importer" app should have access to the page and its files.
4. Providing the required data
The following data must now be provided for the deployment of the Excel Importer:
- The Azure Tenant ID
- The certificate + fingerprint
- The clientID of the app registry for the Excel Importer.
- The ID(s) of the SharePoint site(s).
- The email address of an administrator to be notified in case of an error
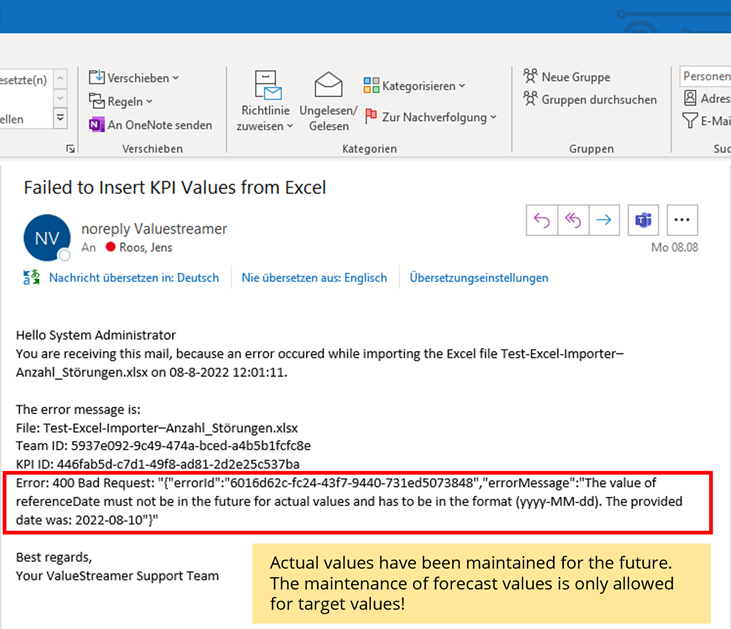
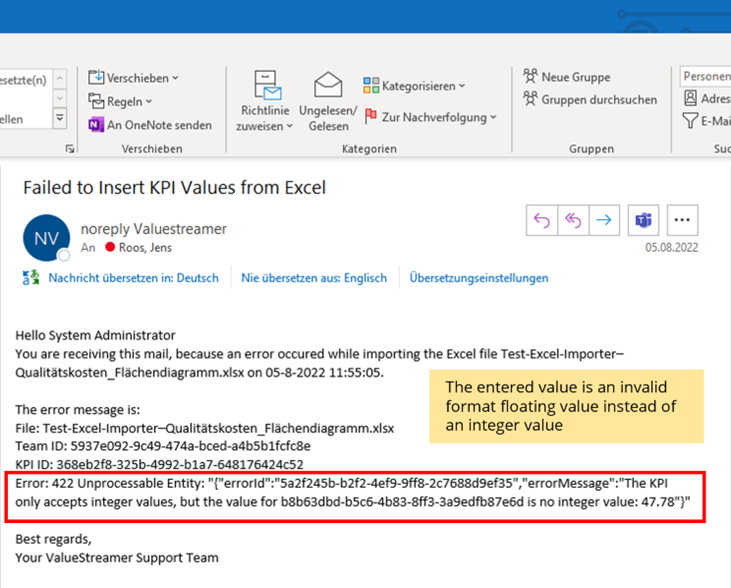
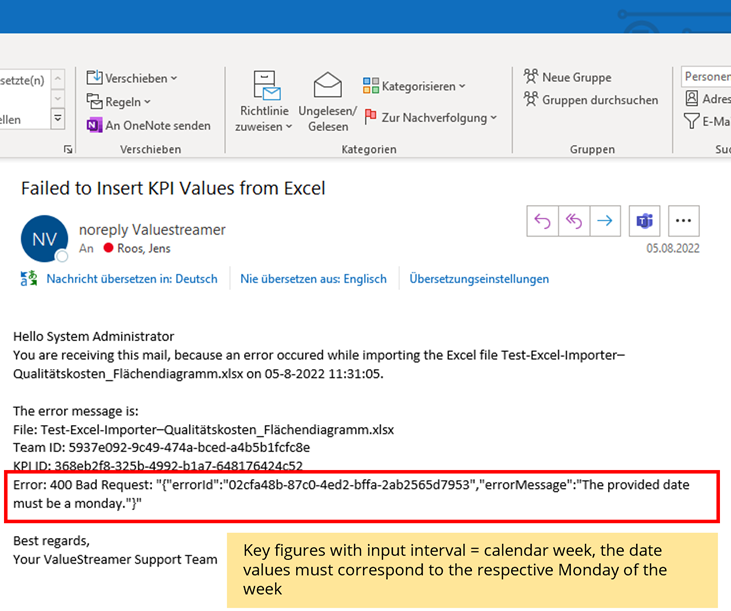
5. Possible Error Messages during Live Operation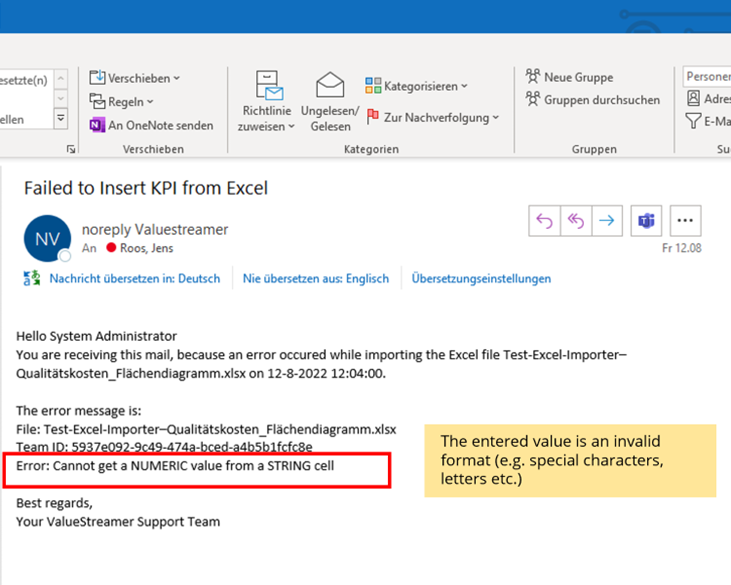
German
Um den Excel Importer betreiben zu können, werden folgende Bestandteile benötigt:
- Ein Azure Tenant
- Ein Zertifikat + Fingerabdruck
- Eine Azure AD Admin App
- Eine Azure AD Applikation für den Excel Importer
- Eine oder mehrere SharePoint Site IDs, von denen Excel-Dateien importiert werden sollen
Optional: Erstellen eines Zertifikats
Falls noch kein Zertifikat existiert, kann mit folgender Anleitung ein selbstsigniertes Zertifikat erstellt werden
Falls noch kein Zertifikat im Format .CER, .PEM, .CRT vorhanden ist, kann auf folgende Weise ein selbstsigniertes SSL Zertifikat (.PEM) mit OpenSSL generiert.
- Unter Windows die OpenSSL Kommandozeile öffnen
- Mit cd path/to/folder in das Verzeichnis navigieren, in dem das Zertifikat abgelegt werden soll
- Mit folgendem Befehl ein Zertifikat erstellen
Dies generiert ein Zertifikat (Public Key) und einen Schlüssel (Private Key), welche in einem späteren Schritt benötigt werden.
Optional: Erstellen einer Admin App
Falls noch keine AdminApp zur Vergabe von SharePoint Berechtigungen in dem Azure Tenant vorhanden ist, sind folgende Schritte notwendig
- Im Azure Portal einloggen
- Über
Azure Active Directory > App-Registrierungen > Neue Registrierung hinzufügen eine neue App-Registrierung anlegen
- Unter
API-Berechtigung -> Berechtigung hinzufügen -> Microsoft Graph -> Anwendungsberechtigungen -> Unter Sites Sites.FullControl.All auswählen und hinzufügen
Dadurch hat die AdminApp später die korrekten Berechtigungen, um der Applikation für den Excel Importer Zugriff auf die SharePoint Sites zu geben, von denen Excel-Dateien importiert werden sollen.
- Um später Berechtigungen für den Zugriff auf SharePoint vergeben zu können, muss für die App eine Client ID und ein Client Secret generiert werden. Diese können unter
Zertifikate & Geheimnisse generiert werden.
Client ID und Client Secret werden nur benötigt um Zugriff auf die SharePoint Sites zu gewähren und sollten nicht weitergegeben werden.
Prozess zur Bereitstellung und Erneuerung des Client Zertifikat
Das Client Zertifikat zur Authentifizierung am Sharepoint Server hat ein bestimmtes Gültigkeits- bzw. Ablaufdatum. Es liegt in der Verantwortung des Kunden, dem ValuesStreamer Support Team rechtzeitig, d.h. spätestens vier Wochen vor Ablauf des aktuellen Zertifikats, ein neues Zertifikat inkl. Fingerabdruck zur Verfügung zu stellen.
Das Zertifikat kann nur durch den ValueStreamer Support aktualisiert werden. Läuft das Zertifikat ab, bevor ein neues Zertifikat zur Verfügung gestellt wurde, ist keine Kommunikation mit dem Sharepoint Server und somit auch kein Import der Kennzahlen über den Excel Importer mehr möglich!
1. Applikation “Excel Importer” erstellen
- Im Azure Portal einloggen
- Über Azure Active Directory > App-Registrierungen > Neue Registrierung hinzufügen eine neue App-Registrierung anlegen
- In der neu angelegten App-Registrierung unter Zertifikate & Geheimnisse > Zertifikat hochladen das Zertifikat (bereits bestehend oder im vorherigen Schritt generiert) hochladen
Nachdem das Zertifikat hochgeladen wurde, den Fingerabdruck des Zertifikates für später speichern.
2. SharePoint Site ID erlangen
2.1 SharePoint Site anlegen (optional, falls nicht vorhanden)
Falls noch keine SharePoint Site vorhanden ist, von der aus die Excel-Dateien importiert werden sollen, dann kann diese wie folgt angelegt werden:
- Firmeneigene SharePoint-Website aufrufen (
https://Domainname.sharepoint.com/_layouts/15/sharepoint.aspx)
- Auf “Website erstellen” klicken und “Teamwebsite” auswählen
- Der Seite einen Namen geben und auf “Fertig stellen” klicken
2.2 SharePoint Site ID erlangen
Um später auf die Daten zugreifen zu können, wird die SiteID der Seite benötigt, welche unter folgender URL sichtbar ist:
https://Domainname.sharepoint.com/sites/Seitenname/_api/site/idIm angezeigten XML-Output ist die UUID der SharePoint Site zu finden.
Die SharePoint Site ID wird im nächsten Schritt benötigt zur Vergabe der Berechtigungen und für die Konfiguration der Imports benötigt.
3. Berechtigungen zum Zugriff auf die SharePoint Site vergeben
Um der App Zugriffsrechte für die SharePoint Site zu geben muss man mit Hilfe der AdminApp folgende HTTP-Requests über ein Tool wie z.B. Postman ausführen. Sollte noch keine Admin App existieren, siehe Optional:-Erstellen-einer-Admin-App
1. Access Token erstellen
POST https://login.microsoftonline.com/{tenantID}/oauth2/v2.0/tokenHeader:
Content-Type: application/x-www-form-urlencodedBody (x-www-form-urlencoded):
client_id: {Client ID der Admin App}grant_type: client_credentialsscope: https://graph.microsoft.com/.defaultclient_secret: {Client Secret der Admin App}In der Response steht ein access_token, welcher im nächsten Schritt benötigt wird.
2. Zugriff auf SharePoint Site gewähren
Für jede SharePoint Site, auf die die Excel Importer App Zugriff haben soll, muss folgender Request mit der passenden Site Id einmal ausgeführt werden:
POST https://graph.microsoft.com/v1.0/sites/{siteID}/permissionsAuthorization:
access_token aus der vorherigen Anfrage als Bearer Token eingeben.
Header:
Content-Type: application/json
Body:
{ "roles": ["read","write"], "grantedToIdentities": [{ "application": { "id": "{ClientID der Excel Importer App}", "displayName": "{Name der Excel Importer App}" } }]}
Jetzt sollte die App “Excel Importer” Zugriff auf die Seite und deren Dateien haben.
4. Benötigte Daten bereitstellen
Für das Deployment des Excel Importers müssen nun folgende Daten bereitgestellt werden:
- Die Azure Tenant ID
- Das Zertifikat + Fingerabdruck
- Die ClientID der App-Registrierung für den Excel-Importer
- Die ID(s) der SharePoint Site(s)
- Die E-Mail-Adresse eines Administrators, der im Fehlerfall benachrichtigt werden soll